Welcome to our comprehensive guide on understanding why fence posts rot at ground level. If you’ve ever noticed your fence looking a bit worse for wear or had to deal with a sagging or leaning structure, you’re not alone. Many homeowners encounter this frustrating issue, which not only affects the appearance of your property but can also compromise its security and value. In this article, we will explore the key factors contributing to fence post rot, including moisture accumulation, soil conditions, and the type of materials used. We’ll also provide practical tips for prevention and maintenance, ensuring your fence stands strong for years to come. Whether you’re a seasoned DIYer or a new homeowner, this guide is here to help you protect your investment and maintain a sturdy, beautiful fence.
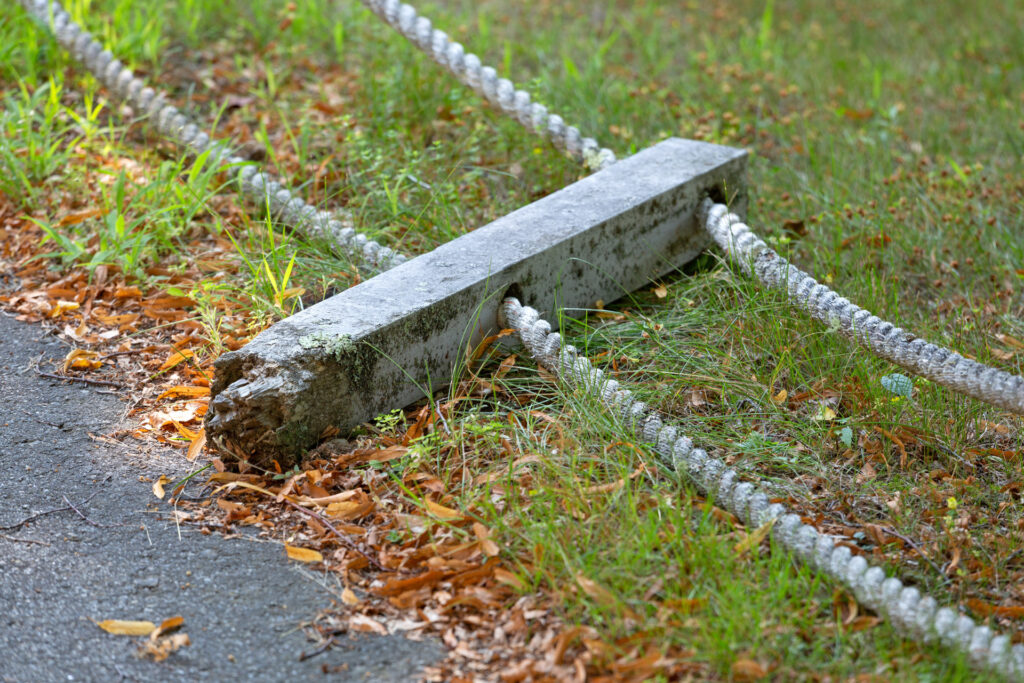
Fence posts often rot at ground level due to a combination of moisture accumulation, lack of airflow, and the type of wood used. When water from rain or irrigation seeps into the wood and the posts are buried in the soil, it creates a damp environment that accelerates decay. Additionally, untreated wood is more susceptible to rot compared to treated alternatives like cedar or pressure-treated lumber. To prevent rot, ensure proper installation depth, improve drainage around the posts, and apply protective coatings to enhance durability. Regular inspections can also help catch early signs of damage before it worsens.
Table of Contents
Understanding Fence Post Rot
What is Wood Rot
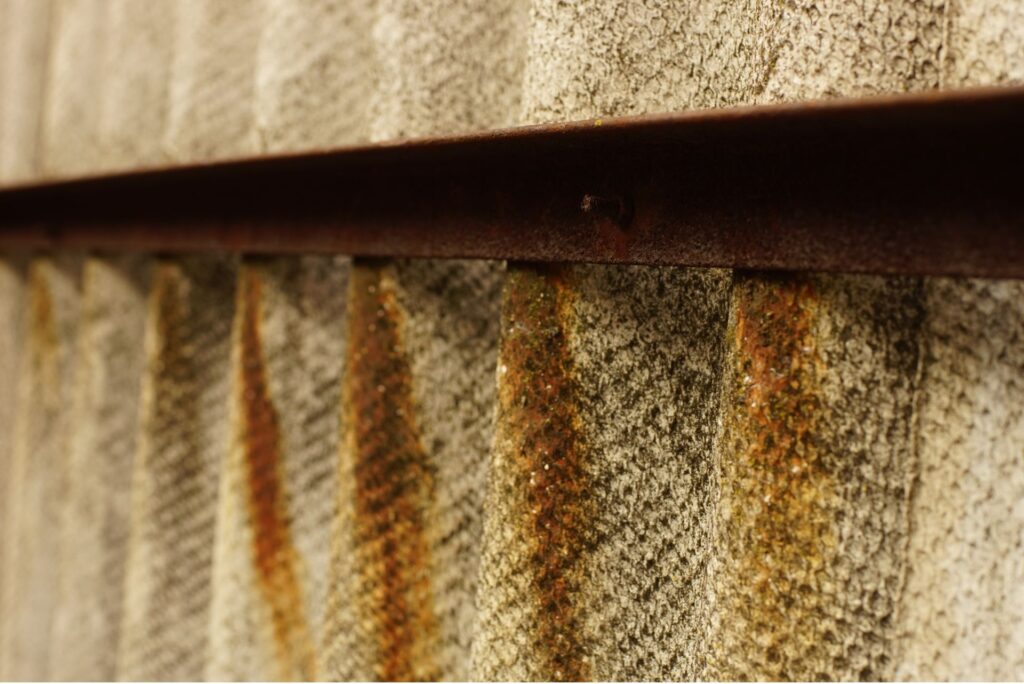
Wood rot is a form of decay that occurs when wood is exposed to moisture for extended periods. This exposure allows fungi to thrive, breaking down the fibers and structural integrity of the wood. As a result, the wood weakens and can become a significant issue, particularly in outdoor structures like fence posts.
There are two primary types of wood rot: wet rot and dry rot. Both can be equally damaging to your fence posts but develop under different conditions.
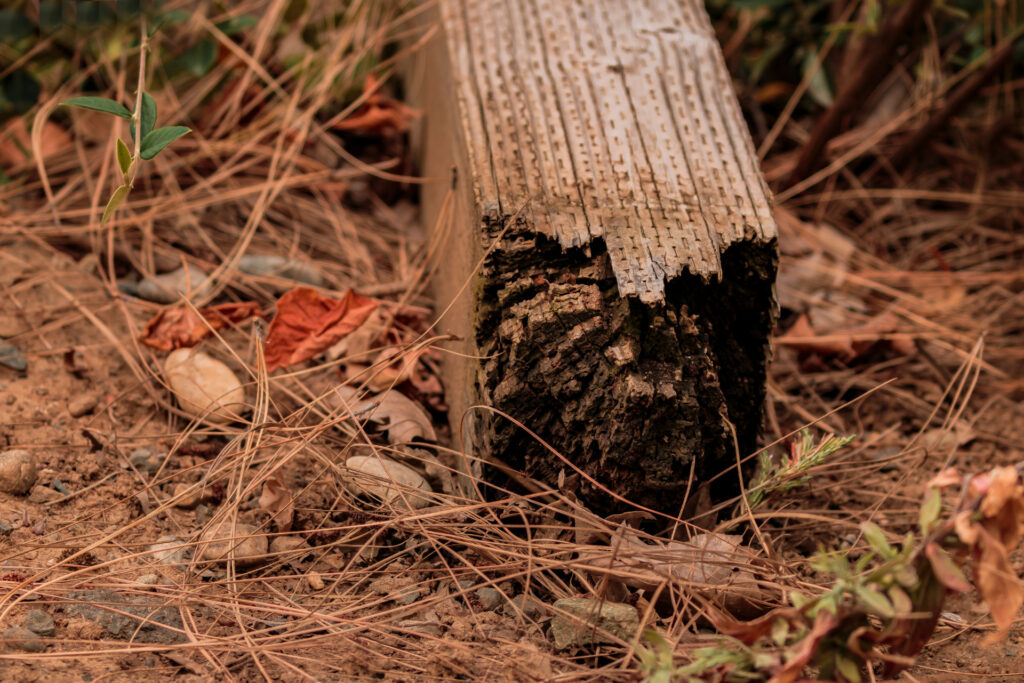
- Wet Rot: As the name implies, wet rot happens when wood is consistently exposed to moisture. This type of rot occurs in damp environments where wood retains moisture, such as where the post meets the ground or in shaded areas. Wet rot is typically dark in color and may feel spongy to the touch. It often produces a musty odor, indicating fungal growth.
- Dry Rot: Dry rot occurs in wood that remains dry for long periods but is still exposed to minimal moisture, such as condensation or slight humidity. Unlike wet rot, dry rot spreads by a specific fungus that thrives in less moist environments. The fungi digest the wood fibers, leading to brittleness and cracking. The appearance of dry rot includes deeper cracks and a crumbly texture.
Understanding the difference between these two types of rot is crucial for proper maintenance and prevention strategies to protect your fence posts.
Visual Indicators of Rot
Detecting wood rot early can prevent larger structural damage. Homeowners should inspect their fence posts regularly, paying close attention to the following visual and physical indicators of rot:
- Softness: One of the most noticeable signs of rot is the softness of the wood. If the wood feels spongy, mushy, or easily indents when pressed with a screwdriver or similar tool, rot is likely present. Healthy wood will remain firm, even under pressure.
- Discoloration: Wood affected by rot may show signs of discoloration. For wet rot, you might see dark patches or stains that indicate moisture buildup. With dry rot, the wood often takes on a grayish or yellowish hue, and the surface may appear more brittle and cracked.
- Mold or Fungal Growth: Another key sign of rot is the appearance of mold, mildew, or visible fungi on the surface of the wood. Wet rot can promote mold growth due to constant moisture, while dry rot might show signs of fungal networks or spore growth.
- Cracks and Splits: Rotting wood tends to develop cracks and splits as its internal structure deteriorates. These cracks can be subtle at first but will become more pronounced as the rot progresses. This is particularly true in dry rot cases, where the wood shrinks and cracks.
- Musty Odor: Wet rot, in particular, often comes with a musty or damp smell due to the growth of fungi. If you notice this smell around your fence posts, it’s an indicator that moisture has been present long enough to start the rotting process.
Regularly checking for these signs can help homeowners catch wood rot early and take preventive measures before the damage becomes irreversible. Proper maintenance and early detection are essential to prolonging the life of your fence and avoiding costly repairs. By understanding what wood rot is, the types of rot that can affect your fence posts, and the signs to look for, homeowners can take proactive steps to protect their outdoor structures.
Why Do Fence Posts Rot At Ground Level
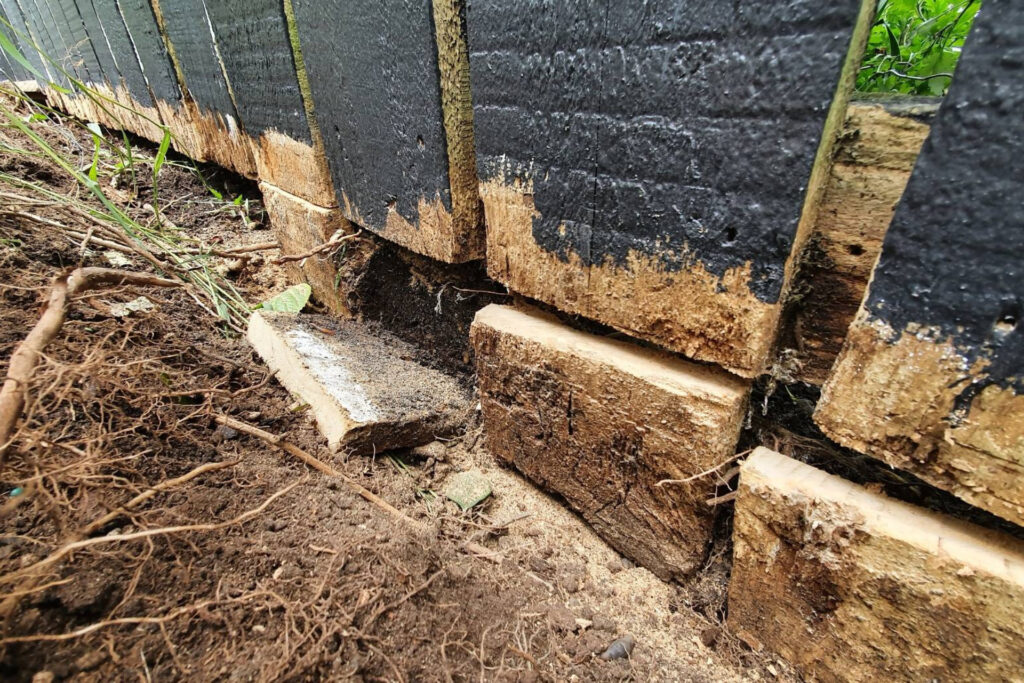
One of the most common issues homeowners and property managers face is the rotting of fence posts, particularly at ground level. While fence posts are designed to last for many years, the area where the post meets the ground is especially vulnerable. This section explains the various factors that contribute to the rotting of fence posts at ground level.
Moisture Accumulation
Moisture plays a critical role in the deterioration of wood, and fence posts are no exception. Water naturally interacts with wood by seeping into its fibers, causing them to expand and weaken over time.
Fence posts, especially those in regions with frequent rain, sprinkler systems, or flooding, are constantly exposed to water. Rainfall directly impacts posts, and water runoff from landscaping or poorly directed sprinkler systems can accelerate moisture accumulation. Over time, this constant exposure to water can lead to the post becoming waterlogged, making it prone to rot.
Lack of Airflow
Proper airflow is vital to maintaining the health of wood. In the case of fence posts, the section buried in the ground or flush with the soil is cut off from proper ventilation. Without airflow, the wood doesn’t have a chance to dry out after being exposed to moisture, allowing rot to set in faster.
Soil contact further limits ventilation around the post. When wood is in constant contact with damp soil, it traps moisture around the post, creating the ideal conditions for wood rot to develop. The lack of airflow, combined with continuous moisture exposure, accelerates the deterioration process.
Type of Wood Used
The type of wood used for fence posts can significantly impact their lifespan and resistance to rot. Some woods are naturally more resistant to moisture and rot than others. For example, woods like cedar and redwood have natural oils that make them more rot-resistant. On the other hand, softwoods like pine or spruce are much more susceptible to moisture and therefore more prone to rotting when exposed to damp environments.
Treated wood is another important consideration. Pressure-treated wood is chemically infused with preservatives that help protect it from moisture and rot. However, untreated wood, even if it’s a harder type, is more vulnerable to rot if it’s in constant contact with moisture and soil. When choosing materials for your fence posts, opting for treated wood is a better investment in the long run.
Soil Conditions
Soil conditions around the fence post can also influence how quickly the wood begins to rot. Different types of soil retain moisture at varying levels. For example, clay soil tends to hold onto moisture for long periods, making the environment around the post much damper. In contrast, sandy soil drains more quickly, reducing the amount of water that stays in contact with the wood.
The presence of organic matter in the soil, such as decaying plants and mulch, can also increase the likelihood of rot. Organic matter holds moisture and provides an ideal environment for fungi, which can further accelerate the rotting process. Proper drainage is essential to keep the area around the fence post drier and less susceptible to rot.
Insect Infestations
In addition to moisture and soil conditions, insects can play a significant role in the rotting of fence posts. Pests like termites and carpenter ants are particularly damaging. These insects feed on wood, burrowing into the post and creating tunnels that weaken the structure. Over time, this damage compromises the integrity of the post and makes it more susceptible to rot.
Common signs of insect infestations include small holes in the wood, sawdust-like residue, or visible tunnels. If pests are identified early, treatments can be applied to protect the post, but if left untreated, insect damage combined with moisture can lead to rapid deterioration.
By understanding these factors moisture accumulation, lack of airflow, wood type, soil conditions, and insect infestations you can take proactive steps to protect your fence posts. Ensuring proper drainage, using treated wood, and keeping an eye on pest activity are all essential to extending the life of your fence.
The Role Of Installation Techniques In Fence Durability And Stability
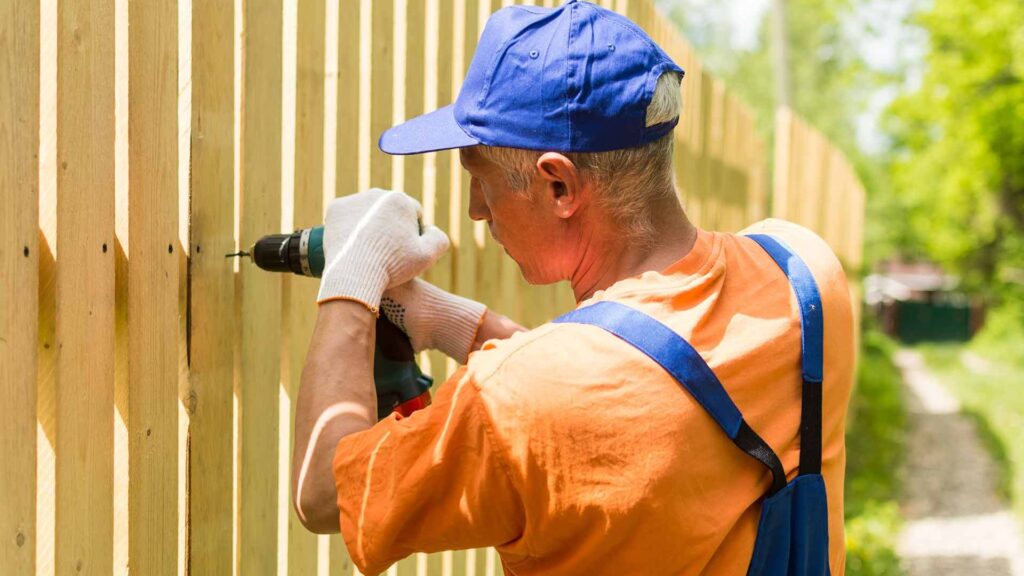
Installing a fence requires careful attention to detail to ensure it remains sturdy and functional over time. Among the various aspects of fence construction, proper installation techniques are critical in determining the longevity and resilience of your fence. Two key factors in this process include the depth of post holes and the appropriate backfilling techniques. Let’s explore these essential components to understand how they contribute to the overall success of your fence project.
Setting the Foundation for a Strong Fence
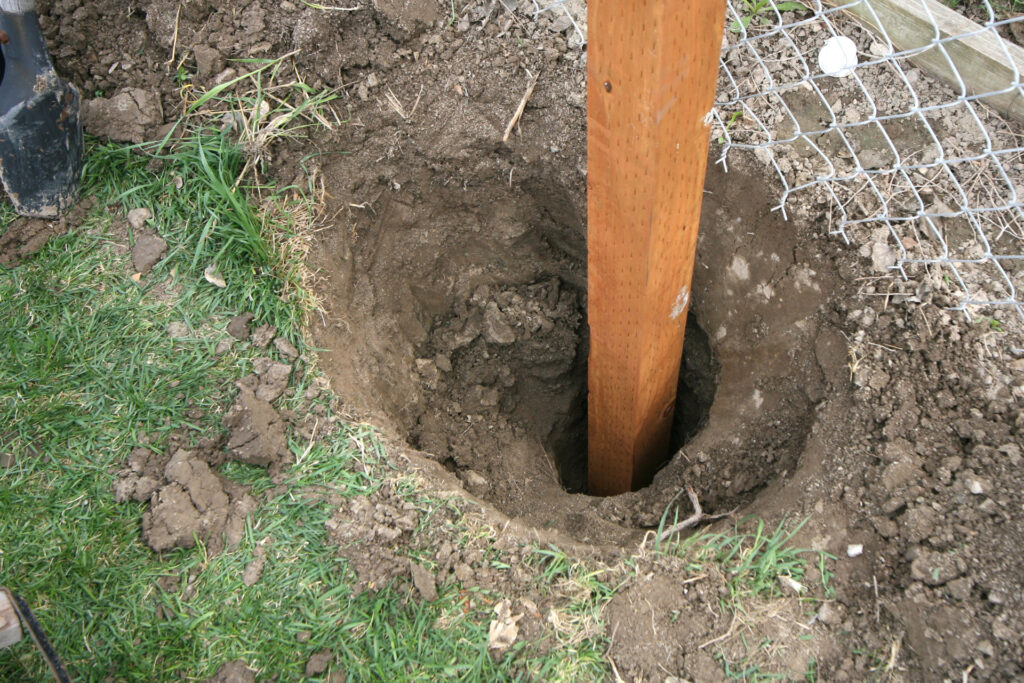
One of the most important steps in building a fence is ensuring the posts are installed at the proper depth. The depth of post holes directly impacts the stability and durability of the fence. Without this foundational support, even the best materials won’t prevent your fence from leaning, shifting, or even collapsing over time.
- Recommended Depth for Fence Posts: As a general rule, the depth of the post hole should be approximately one-third the height of the fence. For instance, if you’re installing a 6-foot fence, your post holes should be about 2 feet deep. This ratio ensures that the fence is well-anchored in the ground, allowing it to withstand wind, soil shifts, and other external forces. However, the exact depth may vary depending on the type of fence, soil conditions, and regional climate. In areas prone to frost, digging deeper holes helps protect against frost heave, where the freezing and thawing of the ground can push posts upward.
- Consequences of Inadequate Depth: Failure to dig post holes to the appropriate depth can have significant consequences. Posts that aren’t set deep enough are more likely to shift or tilt over time, especially in high wind conditions or when subjected to pressure. Additionally, shallow posts can weaken the entire structure, leading to premature wear and the need for frequent repairs. By ensuring the correct depth for post holes, you safeguard your investment and reduce long-term maintenance costs.
Securing and Stabilizing Fence Posts
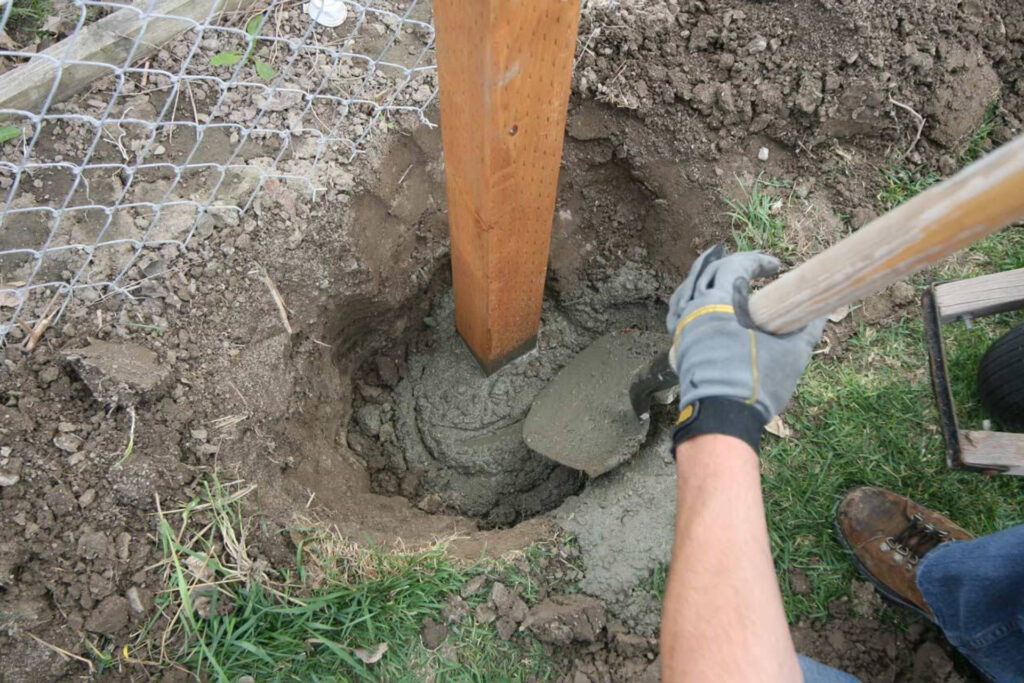
Once the post holes are dug to the appropriate depth, the next critical step is proper backfilling. How you fill and pack the space around the posts plays a vital role in ensuring the fence remains upright and secure for years to come. There are two primary materials used for backfilling: gravel and soil. Each has its own set of advantages, but gravel is generally considered the superior choice for stability and drainage.
- Gravel: Using gravel to backfill around the posts helps promote drainage, preventing water from pooling at the base. This reduces the risk of rot in wooden posts or corrosion in metal posts. Gravel also provides better compaction and stability, reducing the likelihood of posts shifting over time.
- Soil: While soil is often readily available and inexpensive, it doesn’t offer the same level of drainage or compaction as gravel. Over time, soil can settle or erode, especially in areas with heavy rainfall, leading to instability. However, some installers opt for a combination of gravel at the base and soil on top, providing both stability and a more natural look.
Importance of Sloping Soil Away from Posts for Drainage
Proper drainage is essential to prevent water damage to your fence. When backfilling with soil, it’s important to slope the surface away from the posts. This simple technique directs rainwater away from the post bases, reducing the chances of moisture buildup that can lead to rot, rust, or frost heave. In addition to extending the life of your fence, sloping soil away from the posts helps maintain the integrity of the surrounding landscape, preventing soil erosion and water pooling near the fence line.
The role of installation techniques cannot be overstated when it comes to building a fence that stands the test of time. Ensuring the proper depth of post holes and using effective backfilling techniques are fundamental to creating a durable and stable fence. By taking the time to get these steps right, you can avoid common problems like post shifting, structural instability, and premature deterioration. Whether you’re doing the work yourself or hiring a professional, understanding these techniques will help you achieve the best possible results for your fencing project.
Prevention Tips To Extend The Life Of Your Fence Posts
Maintaining the longevity of your fence posts is essential for the overall durability and appeal of your fence. By taking preventive measures, you can avoid costly repairs and replacements down the line. Here’s a detailed guide on how to ensure your fence posts stand the test of time.
Use of Quality Materials
Choosing the right materials is crucial to protect your fence posts from rot, decay, and general wear and tear. Here are some of the best materials for long-lasting fence posts.
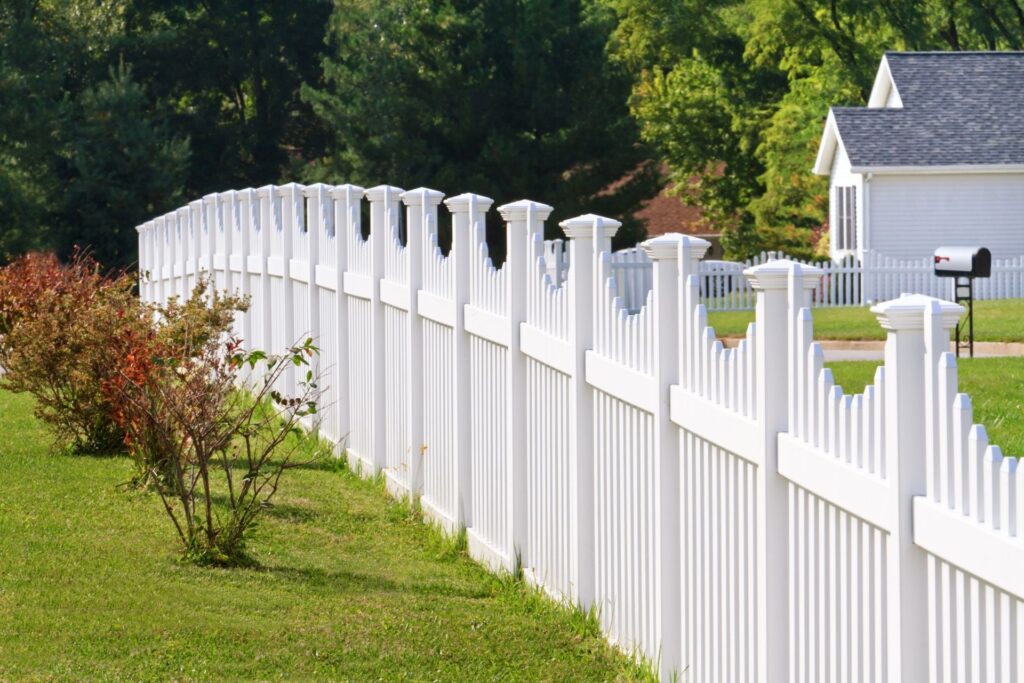
- Cedar: Cedar is naturally resistant to rot and insects, making it a popular choice for outdoor applications. Its tight grain structure also prevents moisture absorption, which is essential for avoiding wood decay.
- Redwood: Similar to cedar, redwood is another excellent choice for fence posts due to its natural resistance to rot and pests. It also has a beautiful appearance, giving your fence a premium look while providing durability.
- Pressure-Treated Lumber: If you want extra protection, pressure-treated lumber is designed to withstand harsh environmental conditions. The wood undergoes a chemical process that infuses preservatives deep into the fibers, significantly extending its lifespan. Pressure-treated wood is especially useful in areas with high humidity or frequent rain.
When investing in quality materials, you’re laying the foundation for a longer-lasting fence that requires less maintenance over time.
Protective Coatings
Applying protective coatings such as sealants and stains is a simple yet effective way to shield your fence posts from the elements. Moisture is the number one enemy of wood, and without proper protection, your posts can quickly deteriorate.
- Sealants: Sealants create a waterproof barrier on the surface of the wood, helping to prevent water from seeping in and causing rot. These are especially useful in wetter climates or areas prone to heavy rain or snow.
- Stains: Stains not only enhance the appearance of your fence but also provide an extra layer of protection against UV damage, which can dry out wood and cause it to crack. They also help to prevent mold and mildew growth.
How to Apply Treatments
- Clean the Posts: Before applying any sealants or stains, ensure your posts are clean and dry. Dirt and moisture can prevent the coating from adhering properly.
- Apply the Coating: Using a brush or sprayer, apply the sealant or stain evenly across the surface of the post. Make sure to cover all sides, especially the base, which is more prone to moisture exposure.
- Allow Time to Dry: Give the treatment ample time to dry before exposing it to rain or sprinklers.
Recommended Frequency
It’s best to reapply sealants or stains every 2-3 years, or more frequently if you live in a region with extreme weather conditions.
Elevation and Drainage Solutions
Keeping your fence posts elevated above ground level and ensuring proper drainage around them are key strategies to prevent rot.
- Techniques to Elevate Posts: One method is to use post brackets or concrete piers to keep the wooden part of the post elevated above the soil. This reduces direct contact with moisture from the ground, which is a common cause of wood rot.
- Installing Drainage Systems: Water pooling around the base of your fence posts can accelerate decay. Installing a gravel bed or French drain at the base of each post can help divert water away. Alternatively, you can slope the soil slightly away from the post base, so water naturally drains away rather than accumulating.
By keeping the base of your fence posts dry, you significantly reduce the risk of rot and extend the lifespan of your fence.
Regular Inspections
Routine inspections are essential for catching potential problems early, before they become serious.
- Frequency of Inspections: Inspect your fence posts at least once a year, ideally after the winter season or heavy rain, when moisture damage is most likely to occur. It’s also a good idea to check after any severe weather events, such as storms or flooding.
- What to Look For:
- Cracks and Splitting: Wood that has started to crack or split may indicate the early stages of rot or decay.
- Discoloration: A change in the color of the wood, especially near the base, can be a sign of moisture damage or fungal growth.
- Soft Spots: Gently press on the wood to see if there are any soft spots. If the wood feels spongy or soft, it may already be rotting inside.
- Insect Damage: Look for signs of termites or other pests that can weaken the structure of the posts.
By conducting regular inspections and addressing issues as soon as they arise, you can keep your fence posts in top condition and avoid the need for costly replacements.
Taking steps like choosing quality materials, applying protective coatings, ensuring proper elevation and drainage, and performing regular inspections can dramatically extend the life of your fence posts. These proactive measures will not only save you time and money but also ensure your fence remains a sturdy and attractive feature of your property for many years.
Repairing Or Replacing Rotting Fence Posts
Over time, fence posts can deteriorate, especially when exposed to harsh weather conditions. A rotting fence post not only weakens the overall structure but can also lead to costly repairs if not addressed promptly. Understanding when to repair or replace a fence post is crucial for maintaining the integrity and longevity of your fence. In this guide, we’ll explore the factors to consider, a step-by-step process for repairs, and when it’s time to call a professional.
When to Repair vs. Replace a Fence Post
Determining whether to repair or replace a rotting fence post depends on several factors.
- Extent of Damage: If the rot is limited to the base of the post, and the upper portion is still in good condition, you might be able to repair it. However, if the post is compromised along its entire length or visibly wobbles, replacement is likely the better option.
- Age of the Fence: Older fences are more prone to ongoing problems. If your fence is nearing the end of its lifespan (typically 15-20 years for wooden fences), replacing the post might make more sense.
- Location of the Post: A rotting post located at a corner or gate can affect the overall stability of the structure. In these cases, replacing the post can prevent further damage.
- Cost Considerations: Repairing a fence post is generally less expensive than replacing it, but if multiple posts are showing signs of rot, the cumulative cost of repairs could make replacement a more practical long-term solution.
Step-by-Step Fence Post Repair Process
Repairing a rotting fence post requires the right tools, materials, and patience. Here’s a step-by-step guide to help you through the process.
Gather Your Materials and Tools
You’ll need the following materials:
- Shovel or post hole digger
- Pry bar or crowbar
- Replacement post (if needed)
- Concrete mix (optional)
- Gravel for drainage
- Wood preservative
- Hammer and nails or screws
- Level
Remove the Rotting Post
- Detach the Fence Panels: Use a hammer or crowbar to carefully remove the fence panels from the post.
- Excavate the Area: Dig around the base of the rotting post to expose the concrete foundation or post stump.
- Remove the Post: If the post is rotting at ground level, you may be able to pry it out. For posts deeply embedded in concrete, use a shovel to loosen the surrounding soil. If necessary, break up the concrete to free the post.
Prepare the Post Hole
- Clear the Debris: If you’re replacing the post, clean out any debris or leftover concrete from the hole. For repairs, inspect the hole and make sure it’s free of rot or excess moisture.
- Add Gravel for Drainage: To prevent future rot, add a few inches of gravel to the bottom of the post hole. This helps with drainage and minimizes moisture buildup around the base of the post.
Install the New Post
- Position the Post: Place the new or repaired post into the hole. Use a level to ensure it’s perfectly vertical.
- Secure the Post: If you’re using concrete, pour the mixture around the post, making sure to slope the concrete away from the base for proper drainage. If you’re avoiding concrete, compact the surrounding soil tightly around the post, layering gravel and dirt for extra stability.
- Reattach the Fence Panels: Once the post is secure, reattach the fence panels using screws or nails.
Apply Wood Preservative
Apply a wood preservative to the exposed portions of the post, especially near ground level, to prevent future rotting.
When to Call a Professional
While DIY repairs can be cost-effective, there are situations where professional help is necessary.
Signs That You Need a Professional
- Extensive Rot: If multiple posts are rotting or the fence itself is starting to sag, it may indicate widespread structural issues. A professional can assess the entire fence and recommend whether full replacement or targeted repairs are needed.
- Complex Post Locations: Posts situated in challenging areas, like on slopes or near other structures, may require specialized tools and expertise that professionals have.
- Structural Damage: If a rotting post has caused significant damage to the fence panels or foundation, professional intervention is essential for proper repairs and long-term durability.
Cost Considerations and What to Expect from Professional Services
- Cost of Professional Fence Repair: The cost of hiring a professional varies depending on the extent of the damage, type of fence, and location. On average, repairing a single fence post can range from $150 to $400, including labor and materials.
- What to Expect: A professional service will handle all aspects of the repair, from safely removing the old post to installing the new one. They will also ensure the fence is level and structurally sound.
Deciding whether to repair or replace a rotting fence post comes down to evaluating the extent of the damage, the age of your fence, and your budget. While minor repairs can often be done on your own, more complex issues may require professional expertise. Regular maintenance and timely repairs will help extend the life of your fence and save you from costly replacements in the future. By following the right steps and knowing when to seek help, you can keep your fence in excellent condition for years to come.
FAQs: About Why Do Fence Posts Rot At Ground Level
What causes fence posts to rot at ground level?
Fence posts typically rot at ground level due to moisture accumulation, lack of airflow, the type of wood used, soil conditions, and insect infestations. Moisture from rain and irrigation can seep into the wood, while poor ventilation prevents it from drying out, leading to rot.
How can I tell if my fence posts are rotting?
Signs of rot include softness or sponginess in the wood, discoloration, visible mold or fungus, and cracks. You may also notice a musty smell or insect activity around the base of the post.
What types of wood are most resistant to rot?
Rot-resistant woods include cedar, redwood, and pressure-treated lumber. These woods contain natural oils or have been treated to resist decay and insect damage, making them ideal for outdoor use.
How deep should fence posts be installed to prevent rot?
A general rule of thumb is to install fence posts at least one-third of their length below ground. For most fences, this typically means a depth of 2 to 3 feet, depending on the height of the fence.
Can I prevent fence post rot with protective coatings?
Yes, applying protective coatings such as sealants or stains can help prevent rot. These products create a barrier against moisture and UV rays, extending the life of the wood.
What should I do if I find a rotting fence post?
If you find a rotting fence post, assess the extent of the damage. If it’s minor, you may be able to treat it with wood preservatives. However, if the post is significantly damaged, it’s best to replace it with a new one.
Is it necessary to call a professional for fence post replacement?
It depends on your comfort level and experience with DIY projects. If you’re confident in your skills, you can replace the post yourself. However, if you’re unsure or the job is extensive, hiring a professional is a good idea.
How often should I inspect my fence posts for signs of rot?
It’s recommended to inspect your fence posts at least once a year, preferably in the spring or fall. Regular inspections can help catch early signs of rot and prevent more extensive damage
What can I do to improve drainage around my fence posts?
To improve drainage, ensure the soil is sloped away from the posts and consider using gravel in the post holes to facilitate water drainage. Installing a drainage system may also help redirect excess water.
Are there any landscaping practices that can help prevent fence post rot?
Yes, maintaining proper landscaping practices such as keeping plants and soil away from the base of the posts, ensuring good airflow, and using mulch to prevent moisture accumulation can all help reduce the risk of rot.
Conclusion
In conclusion, understanding why fence posts rot at ground level is crucial for maintaining the longevity and durability of your fence. The primary cause of rot is the constant exposure of wood to moisture, especially where the post meets the ground, which creates a perfect environment for decay. Other contributing factors include poor drainage, improper installation, and the use of untreated or low-quality wood. To prevent fence posts from rotting, it’s essential to use pressure-treated wood or other rot-resistant materials, install gravel or concrete around the base to improve drainage, and apply sealants or preservatives regularly to protect the wood. Checking the fence periodically for signs of rot or damage is also vital for early intervention. Now is the perfect time to assess your own fence and take preventive steps to avoid costly repairs down the road. If you have any questions or need more advice on how to protect your fence posts, feel free to leave a comment below. We’d love to hear from you and help ensure your fence stands strong for years to come.
About the Author:
Mike Veail is a recognized digital marketing expert with over 6 years of experience in helping tradespeople and small businesses thrive online. A former quantity surveyor, Mike combines deep industry knowledge with hands-on expertise in SEO and Google Ads. His marketing strategies are tailored to the specific needs of the trades sector, helping businesses increase visibility and generate more leads through proven, ethical methods.
Mike has successfully partnered with numerous companies, establishing a track record of delivering measurable results. His work has been featured across various platforms that showcase his expertise in lead generation and online marketing for the trades sector.
Learn more about Mike's experience and services at https://theleadguy.online or follow him on social media: